安装
环境配置
提示
系统:Windows 10 / Window 11 / Ubuntu 18.04 / Ubuntu 20.04 / Mac(没试过)
python >= 3.9
poetry >= 1.1.13
mysql >= 5.6
以前安装过环境的可以跳过
测试环境: Windows10 Mysql8.0 python3.9 poetry1.1.13
安装微软运行库
Windows
- 在官网下载软件并打开(社区版本即可)
- 勾选C++桌面开发,可选勾选前两个,点击安装,等待安装完成
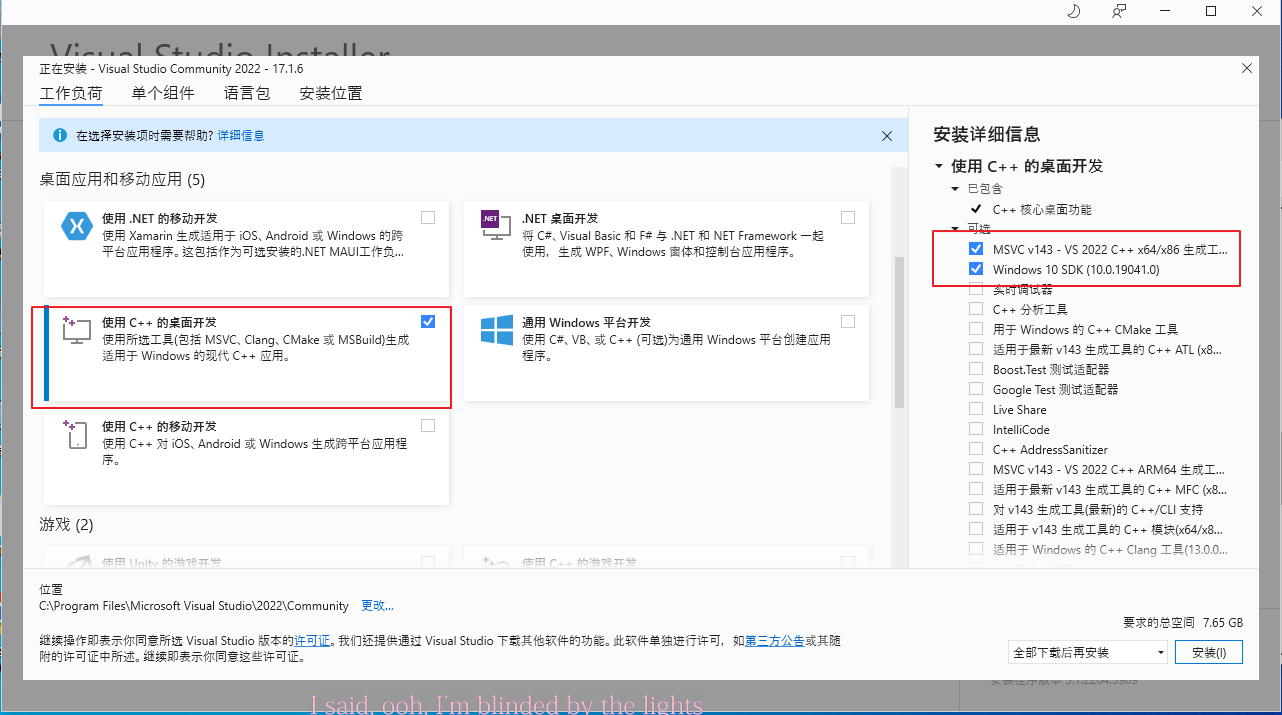
- 点击重启,安装完成
Linux
Linux无需该步骤
安装Python和pip
Window
- 在Python官网下载 python3.9.x 的安装程序
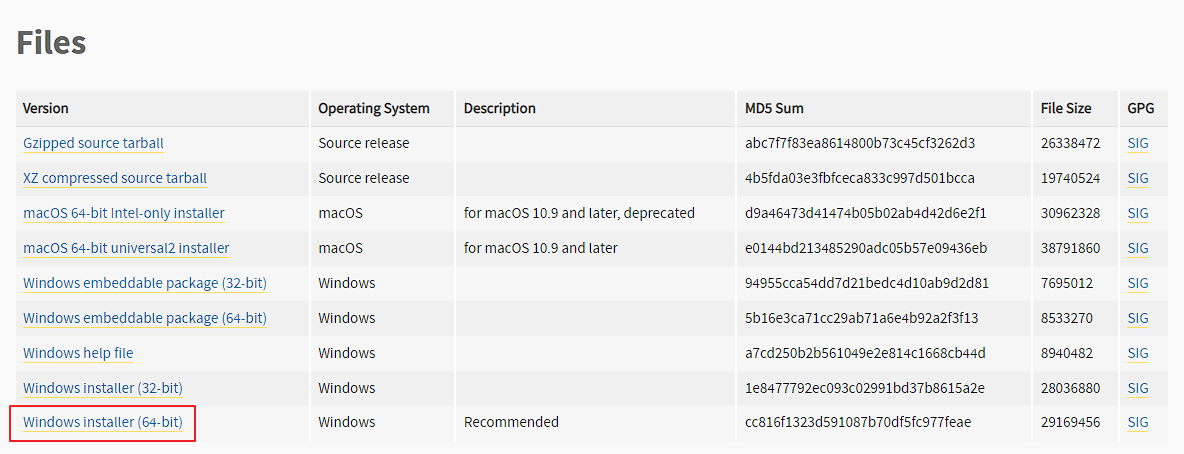
- 安装程序,安装时勾选 Add to Path
- 安装后打开cmd,输入
python -V回车,若显示版本为3.9.x则 Python 安装成功
Linux
方法很多,自行百度
安装poetry
- 在命令行输入
pip config set global.index-url https://pypi.tuna.tsinghua.edu.cn/simple/回车 - 输入
pip install poetry回车,等待安装完成 - 输入
poetry -V回车,若显示版本则 poetry 安装成功
安装mysql
Windows
- 下载XAMPP,打开安装程序,只需勾选 Mysql 即可,其余自行选择,等待安装完成
- 以管理员身份启动XAMPP
- 启动Apache和Mysql
- 选择Mysql栏的 Admin 进入管理面板
- 选择 用户 选项卡,选择主机名为
localhost的root账户,选择change password选项卡,修改密码后确认
Linux
方法很多,自行百度
安装ffmpeg
参考https://docs.go-cqhttp.org/guide/quick_start.html#%E5%AE%89%E8%A3%85-ffmpeg
安装并配置go-cqhttp
Windows
- 新建一个文件夹用于存放程序
- 根据自己的系统下载最新版的go-cqhttp,不知道现在那个版本的请参考版本说明,这里以Windows10系统演示(Github 打不开的可以自行百度 github hosts加速)
- 打开
go-cqhttp.exe,一路确定 - 打开
go-cqhttp.bat, 输入3,然后回车 - 打开
config.yml(使用记事本,vscode等打开),修改uin和password为机器人的账号和密码(不建议使用自己的主账号) - 修改
universal为ws://127.0.0.1:25888/onebot/v11/ws, 其余项目根据自己需要修改 - 打开
go-cqhttp.bat,可能会要求扫码或验证码,若出现下图的提示说明安装成功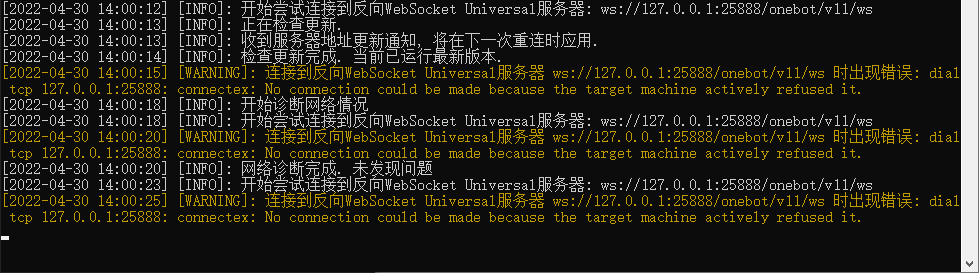
Linux
wget https://github.com/Mrs4s/go-cqhttp/releases/download/v1.0.0-rc3/go-cqhttp_linux_amd64.tar.gztar -xvf go-cqhttp_linux_amd64.tar.gzcd go-cqhttp_linux_amd64vi config.yml,按i开始修改,将universal修改为ws://127.0.0.1:25888/onebot/v11/ws,修改uin和password为机器人的账号和密码,修改完输入:wq,回车退出./go-cqhttp,可能会要求扫码或验证码,若出现下图的提示说明安装成功
安装机器人
Windows
- 前往Github下载最新版本的压缩包并解压
- 在解压后的文件夹内打开cmd,输入
poetry install,等待安装完成,安装期间请不要关闭程序,根据机器配置不同可能需要5~20分钟 - 安装完成
Linux
- 输入
git clone https://github.com/Shine-Light/Nonebot_Bot_MayaFey.git回车 - 进入目录,
poetry install,等待安装完成,安装期间请不要关闭程序,根据机器配置不同可能需要5~20分钟 - 安装完成
安装原神祈愿API(可选)
提示
如果不需要这个功能可以跳过这一步
Windows
- 下载 https://dotnet.microsoft.com/en-us/download/dotnet/thank-you/runtime-aspnetcore-6.0.8-windows-hosting-bundle-installer 并安装
- 新建一个文件夹用于存放程序
- 在 https://github.com/GardenHamster/GenshinPray 中下载源代码并解压
- 进入解压后的文件夹,保留
GenshinPray/PrayMaterial文件夹,GenshinPray/PrayMaterial/initData.sql和GenshinPray/Fonts/zh-cn.ttf文件,其余文件删除 - 打开
zh-cn.ttf并安装 - 在 https://github.com/GardenHamster/GenshinPray/releases 中下载最新版本的
GenshinPray.zip并解压 - 进入文件夹,编辑
appsettings.Production.json,按要求修改以下代码并复制,然后替换原有内容,路径中的\要写成\\
{
  "ConnectionString": "Data Source=127.0.0.1;port=3306;Initial Catalog=genshinpray;uid=root;pwd=数据库密码;CharSet=utf8mb4;SslMode=None;", //数据库链接字符串
  "PrayImgSavePath": "机器人目录\\resource\\img\\GenshinPray", //祈愿结果图片保存目录
  "PrayMaterialSavePath": "PrayMaterial目录", //祈愿素材图片目录
  "PrayImgHttpUrl": "{imgPath}" //祈愿接口中返回的图片地址
}
- 在cmd中运行
dotnet GenshinPray.dll --launch-profile Production --urls http://0.0.0.0:8081,等待初始化完成后退出程序 - 在 xampp 中打开 mysql 管理面板
- 选择
genshinpray数据库,选择导入选项卡,点击选择文件,选择initData.sql,点击执行,成功后退出面板
Linux
- 在 https://github.com/GardenHamster/GenshinPray/releases 中找到最新版本的压缩包链接,替换下方的
{releases} - 根据情况修改以下代码,顺序将以下代码复制粘贴回车运行
screen -R Genshin
cd /机器人目录
git clone https://github.com/GardenHamster/GenshinPray.git
cd GenshinPray/GenshinPray
mv PrayMaterial /机器人目录/GenshinPray/PrayMaterial
mv Sql/initData.sql /机器人目录/GenshinPray/initData.sql
cd ..
rm -rf GenshinPray
cd ..
wget {releases}
unzip GenshinPray.zip
rm -f GenshinPray.zip
wget https://dot.net/v1/dotnet-install.sh
sudo bash dotnet-install.sh -c 6.0 --runtime aspnetcore
ln -s $HOME/.dotnet/dotnet /usr/bin/dotnet
cd GenshinPray
vim appsettings.Production.json
- 将以下代码的
{password}替换为你的数据库密码,粘贴并保存
{
  "ConnectionString": "Data Source=127.0.0.1;port=3306;Initial Catalog=genshinpray;uid=root;pwd=数据库密码;CharSet=utf8mb4;SslMode=None;", //数据库链接字符串
  "PrayImgSavePath": "机器人目录/resource/img/GenshinPray", //祈愿结果图片保存目录
  "PrayMaterialSavePath": "PrayMaterial目录", //祈愿素材图片目录
  "PrayImgHttpUrl": "{imgPath}" //祈愿接口中返回的图片地址
}
- 按下
:wq回车保存 - 输入
dotnet GenshinPray.dll --launch-profile Production --urls http://0.0.0.0:8081,回车 Ctrl+C退出程序- 运行
mysql -uroot -p你的密码 genshinpray<initData.sqlCtrl+A+D返回主窗口